Before starting the construction of a large cottage or a small country house in a suburban area, a modest compact structure appears, which can be called a change house, utility room or utility block. A useful room, divided by partitions into several sections, can play the role of a bathroom, pantry, tool storage, or even a summer kitchen. It is difficult to underestimate the value of this building, therefore, we will consider in more detail what is the purpose of the hozblok for a summer residence and whether it can be built independently.
Purpose of this utility room
The hozblok - the structure is small in size, but universal, so it is absolutely not limited to any framework in its use. Its purpose depends entirely on the priorities put forward by the owners of the suburban residence. Initially, outbuildings were used to store construction and garden tools, some materials, country equipment. Long work on the garden beds or on the construction site led to the fact that the summer cottages turned part of the room into a kind of summer kitchen so that you could have a cup of tea and a little rest.

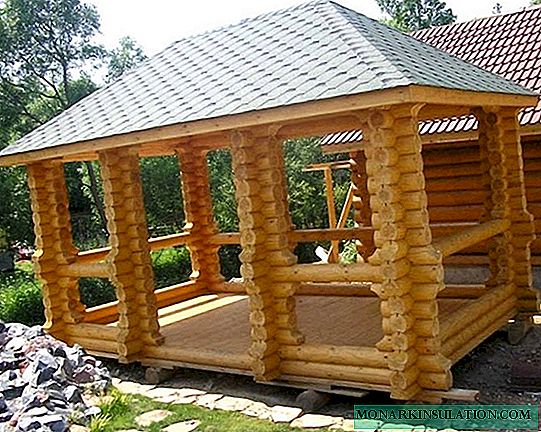
Some household units are more reminiscent of a country house than a utility room: they are decorated with siding, covered with flexible tiles and decorated with decorative elements.
Long work makes itself felt, especially in the hot season, so summer residents who are especially concerned about their health have allocated a small angle for a shower; accordingly, a toilet that requires a very small area can fit behind a partition. If the footage of the building allows, then part of it can be reserved for the relaxation room, and if you install a bed in it, you can safely spend the night, while the air temperature allows. It is clear that with the appearance of a house on a suburban territory, a household block will lose some of its functions, however, it will always remain useful and in demand.
Housing units can be completely different in appearance and resemble any kind of structure, from an ordinary simple barn to a fabulous house decorated with openwork carvings.

Many summer residents attach great importance to the style of each object located on the site. Such a compact structure in the style of minimalism is suitable for owners who keep pace with the times
You can purchase the finished design in assembled or disassembled form, which resembles a block frame-modular container. It is formed from a corner and a channel, and then sheathed with a wood plate. The advantages of this type of structure:
- fast erection speed;
- lack of foundation;
- mobility;
- the possibility of multiple assembly-disassembly;
- affordable cost.
You can build a house block with your own hands, having previously prepared a tool and purchased material.

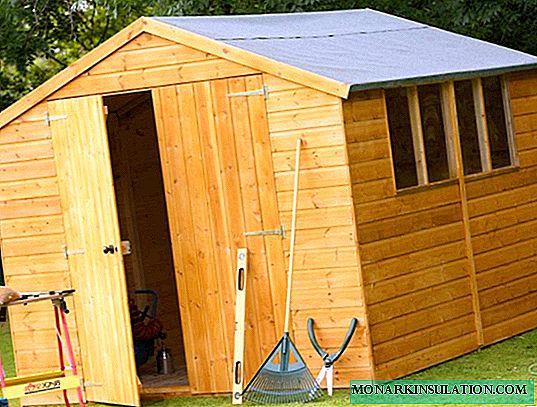
The most popular household buildings made of wood - plastic, easy to process, durable material, with proper processing, ready to serve for decades
The easiest way is to erect a wooden change house, sheathe it outside with a lining or profiled sheet, and cover the roof with inexpensive rubber tiles or sheet metal. A pair of walls is equipped with windows so that sunlight penetrates inside. The room with the help of partitions or cabinets is better divided into several zones that differ in purpose. To feel comfortable in the winter house, its walls, floor and roof should be strengthened with thermal insulation - glass wool mats, a membrane or polyurethane foam.
Rules for installing this building
The place for the utility room is regulated by the requirements of SNiP 30-02-97, while the purpose of the utility unit is taken into account. Suppose you decide to have a shower there, in this case the minimum distance to the neighboring building should be 8 meters, and at least one meter to the border of the site. Each meter, located between the building and other objects, can be beneficial: on a small piece of land you can arrange woodpile, build a small canopy or plant a fruit shrub.

Using the hozblok as a bathroom, as well as for keeping poultry or livestock, monitor the distance: to residential buildings - at least 12 meters, to the neighboring territory - at least 4 meters
On 6 hundred square meters, each square meter of a summer residence is worth its weight in gold, so the only way to save more land for planting is to combine all the household premises under one roof, creating something like a multi-purpose building. It resembles an ordinary house with many rooms, it differs only in size and degree of insulation. For example, a toilet, shower and pantry can easily fit in one room, and a large awning on the side will replace the garage.

Diagram of a multi-functional household unit, consisting of several sections in which you can place a rest room, a bathroom with shower and toilet, a pantry for storing canned goods or tools
Another interesting solution is the construction of the second floor. In the upper room you can arrange a guest room, dovecote or hayloft, if the cottage contains rabbits or goats.
Step-by-step instructions for the construction of a wooden hozblok
Now many companies offer prefabricated buildings, but it is much more interesting to create and equip the premises of a hosblock for a summer residence with their own hands. For the sample we take a building with dimensions of 6m x 3m x 3m.

Ready hozblok consists of two separate rooms, each of which has a separate entrance. The windows are on three walls, excluding the rear
Before the construction process, you must purchase the material:
- timber of various sections (15cm x15 cm, 10cm x 15cm, 10cm x 10cm, 5cm x 10cm);
- edged board;
- roofing material (or equivalent);
- plywood;
- sand, gravel, cement for concrete;
- asbestos-cement pipe (15 cm in diameter).
Step # 1 - installing the foundation
The first stage is the perimeter marking for the future foundation. The posts will be in the corners and in the center of the long, 6-meter-high walls. First you need to prepare the soil - remove the layer of turf and fertile soil to a depth of 20 cm, fill up a sandy 10-centimeter pillow and carefully compact it. For each column, a pit with a depth of about 1 m 20 cm will be required - a column for the foundation of the appropriate length should be placed in it.

The sizes of the hosblock can be different and depend on its purpose, therefore it is not necessary to focus on the given parameters - the length or width can be changed
The bottom of each hole also needs to be prepared: cover with a thick layer of fine gravel or sand, tamp. After installing the pipes in the finished holes, their strictly vertical position is checked (it is better to use the building level), and the free space is covered with sand. The inside of the pipes should be filled with cement mortar by about one third, and then raise the length of the pipe. As a result of this action, concrete provides a solid foundation for foundation pillars.

The foundation on asbestos-cement piles - a guarantee of stability and durability of the structure; you can build a hoblock without a foundation, but it will be less reliable and will serve a shorter period
Then it is necessary to completely fill the cavity of the pipes with cement mortar. To strengthen the subsequent fixation of the base from the beam, in four corner columns mount pieces of reinforcement fixed in the solution and protruding upwards by about 20 cm.Instead of reinforcement, you can use anchors also fixed on the foundation: the frame from the beam is attached to them by nuts. Pipes should be poured carefully so that no sinuses form. Final hardening will occur only after a couple of weeks, during which time the solution should be moistened with water and covered from direct sunlight.
Step # 2 - forming the base frame
While the foundation "matures", you can do the assembly of the frame. The most powerful beam (15cm x 15cm) is fixed in the shape of a rectangle, the long side of which is 6 m and the short side is 3 m. At the corners, a “half-tree” mount is used, the grooves are connected with self-tapping screws (2 pieces are enough for an anchor, 4 pieces for reinforcement) . Between the foundation posts and the wooden frame, it is necessary to make a layer of roofing material, the ends of which should be bent down (so that rain water does not accumulate). To protect against insects, mold and moisture, the beam is treated with an antiseptic. One of the traditional options is two layers of drying oil. Then the frame is reinforced with three transverse lags located at the same interval, using a bar 10cm x 10cm.

The main qualities of the frame are stability and reliability, so the main attention should be paid to the joints of the beam and the processing of wood with protective agents
Step # 3 - frame construction
For the construction of the frame, a beam with a smaller diameter should be used than for installing the foundation. First you need to collect parts of the frame from the ends, taking into account the fact that there will be window openings on both sides. Vertical racks are fixed on the frame using steel corners and self-tapping screws. In order to "mount" the rack on the foundation reinforcement, it is necessary to drill a hole with a diameter of 1 cm (in this way 4 corner posts will be fixed). Between them, additional elements and struts are fixed - with the help of bolted connections. Opposite sides after assembly should look identical.

To strengthen the fixation between the first and second, as well as the third and fourth racks, you should install struts - small bars of a smaller cross section, located diagonally
Then the front facade is assembled. The middle posts are fixed in increments of 1m 80 cm. So that they do not move during the fixation of other elements, they can be temporarily connected to each other by a board mounted on self-tapping screws. It is planned that the hozblok consists of 2 sections, so you need to arrange 2 doorways and additionally install a partition. The dimensions of the doorways are 2 m high and 85 cm wide. On the front side there will also be a window opening, its location is between 2 and 3 racks.

In the course of assembly, window crossbars should be set: the distance from the frame to the lower horizontal is 80 cm, the distance between both horizontals is 1 m
The rear facade is assembled similarly to the front, but the process is simplified due to the absence of window and door openings. You should set the two middle racks with an interval of 1 m 80 cm, and fix the braces between the pairs of racks. The final touch is the upper interchange at a height of 2 m, for which a beam of 5 cm x 10 cm is used. It is formed from elements fastened together “butt” and fixed by galvanized corners.
Step # 4 - rafter and roof assembly
The assembly of the rafters is best done on the ground, and then ready-made to install on the hozblok. It is important to assemble the crate correctly - solid or at intervals, depending on the roofing material. The angle of the roof is approximately 10 degrees. When installing the rafters are mounted on self-tapping screws, and overhangs and cornices are trimmed with a trimmed board. To avoid the appearance of cracks, holes for self-tapping screws are pre-drilled.

The roof structure is installed as follows: it is placed on the logs behind the building, then it rises up with the help of stops or traction and is inserted into the grooves
Step # 5 - inner and outer skin
The final stage is cladding the lining from the outside and the interior design of the premises. A roof covering (tile, slate, sheet metal) is laid on the roof, doors are hung, windows are inserted. If necessary, internal partitions of the frame type are installed, which can be sheathed with plywood. To warm the outer walls, you can use mineral wool or polystyrene foam.
If you have at least a little experience in carpentry, the construction of a summer house does not seem complicated and intricate. In the future, instead of the first, trial version, you can build a more reliable and strong structure.

If the household building is being built after the construction of the house, it can be made in the form of an extension to the main building by making an additional internal entrance
Video clips with examples of building hozblokov
Video # 1:
Video # 2:
Video # 3: