Owners of suburban areas, characterized by a complex shape of the relief, trying to equip the territory as comfortably as possible, often choose wooden deck platforms. Wooden floorings raised above the ground can not only expand the space in front of the house, but also help to “master” the site, which is unsuitable at first glance for use. Where hilly soil turns into a slippery surface after rain, a wooden deck is the perfect solution.
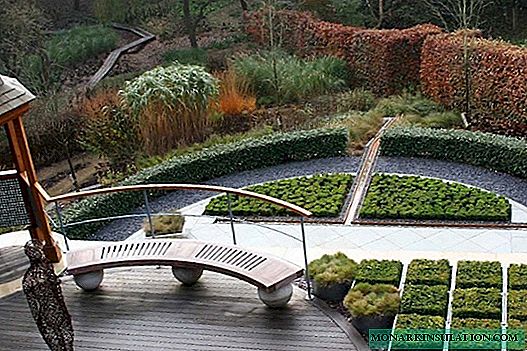
Decks in landscape design
The base of the platform is wooden strips laid on thick beams or directly on the ground. Such platforms are appropriate in areas with uneven terrain. With their help, you can achieve several goals at once:
- use the hilly surface, turning it into a convenient area for recreation;
- strengthen the hillsides, keeping the soil from sliding under the influence of precipitation.
Wooden flooring is a wonderful element of landscape design, on which you can equip a corner for relaxation, or use instead of an open veranda. Some owners build platforms not only on the ground floor, but even on the upper floors of the suburban cottage.

The deck is a multifunctional structure that can be a worthy alternative to the traditional terrace on the lower floor
The deck does not have to be part of the house. With a platform you can enclose an outdoor pool, a decorative pond or arrange a relaxation area closer to the garden.
It is always convenient to sit on such a platform by placing garden furniture on a flat surface. With it, you can refine any place on the site, even using the "islands", unsuitable at first glance, for use.

The platform built in front of the porch can smoothly pass into the patio courtyard hidden from prying eyes, connecting with it a series of steps
Wooden flooring can be safely used for arranging a patio. A built platform creates the effect of terracing a hilly area. Only terraces in this case are not earthen plots, but wooden platforms, interconnected by steps.
But it is worth considering that wooden decks are not able to fit into all areas of landscape design. Most appropriate they will look against the background of wooden country style houses. Wooden flooring also fits well in the "wild garden".
Options for arranging platforms
Platforms are built from planed boards, which are laid on longitudinal and transverse beams mounted on piles. The role of piles lifting the platform above the ground can be performed by brick pillars or wooden beams.
The pattern of the flooring is largely determined by the size of the boards, the way of laying the strips and dimensions of the structure under construction. When arranging the flooring, most often the strips are laid parallel to the sides of the base.

To create the illusion of expanding the area, it is better to lay the boards diagonally: in this case, attention will focus not on the details of the structure, but on tracking the picture
More complex compositions such as a checkerboard or herringbone look advantageous in combination with the surrounding textures, made in the same style.
There are frequent cases when a conceived drawing does not give the desired effect. For example, when the platform is located between the house, the facade of which is made of wooden shingle, and a garden path decorated with paved tiles. In such a situation, it is better to choose a flooring with a simple pattern, when the boards are laid out parallel to the sides of the base of the platform.
In order to avoid disappointment when choosing a drawing, designers recommend, in addition to drawing the flooring itself, to draw a sketch of the drawing on the tracing paper. For a better visualization of the author’s ideas, the drawing and sketch should be done on the same scale.

The more sophisticated the drawing of the constructed platform, the more complex the structure of the platform being erected for its construction will have
So, when drawing up a diagonal pattern, frequent installation of the lag will be required. To create more complex species, you will need already double logs from a massive beam, the intervals between which allow you to place the end plate.
The form of the platform can be any:
- simple - in the form of a rectangle or square.
- complex configuration, when a multi-level design creates a kind of cascade of open terraces.
Rectangular decks look most advantageous along the wall of the house, and square scaffolds are successful in the angular arrangement between adjacent walls.
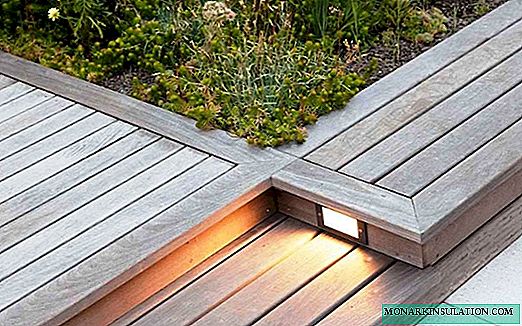
Railing is one of the key elements of the platform, giving it safety and reliability. This is especially true if the deck is built on the shore of a reservoir.

Low partitions and openwork trellises will help to shelter from the wind in inclement weather and to retire from prying eyes for rest and relaxation
By setting up outdoor flowerpots with flowers next to wooden fences, you can easily turn your rest area into a blooming green oasis.
DIY construction deck
There are many ways to build wooden platforms. Most of them can be done even by craftsmen who possess only the basic skills of carpentry.
Stage # 1 - Timber Selection
Scaffolds are built from standard boards with dimensions of 50x75 mm, 50x100 mm, and 50x150 mm. A good effect is achieved both when using strips of the same width, and by alternating boards with different widths.
Masters do not recommend using boards with a width of 200 mm for these purposes. They do not drain water well, and moisture trapped on their surface often leads to warping of wood. Unsuitable for arranging decks and bars measuring 50x50 mm. They are also easily twisted and deformed.

The most durable floorings are obtained from boards measuring 50x100 mm and 50x150 mm, laid parallel to the sides of the base platform
To equip the platform using different types of wood:
- coniferous - pine, smereka, ordinary spruce;
- deciduous - aspen, alder, modrina.
Boards for arranging flooring must be cleaned of bark. For the manufacture of lags, it is better to choose not milled boards of the 2nd or 3rd grade, the moisture content of which is 10-12%. Support beams are best made from blanks of square timber with a side of 75 mm.
Regardless of the choice of wood used to extend the life of the flooring, the surface is treated with antiseptics and moisture repellents.

The use of azure, presented on the market in a wide color palette, provides opportunities for the implementation of any design exterior solutions
Fire resistance of wooden platforms is achieved by additional surface treatment with flame retardants.
Stage # 2 - layout design
The dimensions and dimensions of the platform depend on the place where the deck will be located, and its purpose. Do not place the platform in the full shadow created by the wall of the house. Dampness and shading - a fertile environment for the development of fungus.

If the deck will play the role of a dining area, then provide enough space for the installation of a furniture set, allocating an area for easy access
If you plan to use the platform for taking solar procedures and relaxing with your family, calculate the area for installing sun loungers.
To visualize what territory the deck will cover and how it will look from the windows of the upper floors, draw a construction plan. It is better to draw a site plan on graph paper, maintaining a uniform scale of buildings. If the platform will be built on a slope, draw a side view of the structure to indicate the slope. A well-designed drawing will simplify the task of determining the height of the support posts to create a perfectly horizontal surface.
In the place they determine the site where the pillars will be dug. When choosing a place for installation of piles, do not forget to consider the communication pipes laid to the house in the ground. Your task is to provide the necessary access to the inspection hatches in order to carry out preventive and repair work if necessary.
To build a platform you will need tools:
- roulette;
- square;
- hacksaw;
- screwdriver;
- building level;
- sandpaper.
The size of the strapping of the future flooring depends on the width of the boards used. For example: for laying a flooring with a simple pattern, consisting of 21 boards, you will need to build a strapping that will correspond to the total width of 21 boards and plus 10 cm, which will leave 20 gaps between them.

Regardless of the selected pattern, the boards are laid on a platform with a gap of 5 mm: this is necessary in order to prevent stagnation of rainwater
Stage # 3 - installation of support pillars
When installing a deck on “floating” soils to increase the strength and reliability of the building, the wooden ones are not buried in the ground, but are placed on concrete slabs equipped with rectangular nests.
Each base plate with a thickness of 15 mm has a square shape with a side of 400 mm. They are placed at an equidistant distance of 1.4 meters. In this case, the distance is measured not from the edge of the plate, but from the center.
Having determined the places of installation of slabs and pillars, in the designated areas, the fertile layer of soil is removed and a layer of gravel is poured. Plates are laid on compacted crushed stone, poured with concrete mortar, and level.

It is important to ensure that the slab nests are located in one line and form a right angle relative to the wall of the nearest building
The remaining unused soil surface is lined with agrofibre cuts. Opaque material will inhibit grass growth. To fix the non-woven fabric and consolidate the effect, the entire surface is covered with fine gravel.
The support posts are blanks made of solid timber or glued from boards with a 7.5-centimeter spike at the base. Poles are inserted with spikes into the slots of the plates and bolted to the plates. If necessary, the support legs can always be adjusted in height, cutting off the excess.

To extend the life of the flooring, the wooden surfaces of the posts are treated with an antiseptic and moisture repellent
When installing poles, it is important to ensure that the supports located at the lowest point are not below the intended height of the platform. Check the horizontal surface every time, focusing on the construction level.
Stage # 4 - making the harness
Having established the supporting posts, they begin to manufacture the harness. First of all, lay out the external beams, fixing them at the corners end-to-end. Intermediate lower beams mounted parallel to the wall of the house are laid on shortened posts.

The beams that will be installed around the perimeter of the deck are laid horizontally and nailed around the support posts
To do this, holding each beam around the support pillars, align its horizontalness with alcohol level. Beams are fixed with galvanized screws or 10-centimeter nails. When arranging a multi-level platform, the crossbars of the lower and then upper levels are nailed separately. All beams are butt-joined at the outer corners.
Intermediate beams are laid on the assembled frame and supporting posts. It is important to ensure that the sections of the intermediate beams are at the same level as the upper boundary of the outer frame.
Stage # 5 - flooring
The technology of laying the platform is not much different from the process of flooring ordinary floors. After sawing boards with a length equal to the distance from one external beam to another, lay them across the frame.
If the platform adjoins the wall of the house, first lay the board, placing it at a distance of 10-15 mm from the vertical surface.

Subsequently, when laying strips for ventilation and natural expansion of wood between the boards, a distance of 5 mm is maintained
To facilitate the task of maintaining the required distance between adjacent planks of the flooring, the use of a calibrated wooden strip will help.
The flooring is fixed to the platform with screws, nails or special clamps. To strengthen the fastening, in addition to the screws, the craftsmen also recommend using building glue. It is applied to the ends of the platform with a pistol. But this installation method is fraught with the fact that after the glue hardens, the boards cannot be moved. This will complicate repairs in the event of damage to the deck.
The second strip is mounted on the crest of the installed and fixed first board. In order to dock the elements as tightly as possible, the comb is gently tapped with a hammer. In the internal corner of the ridge against each log, maintaining an angle of 45 °, hammer nails.
For fixation, it is worth taking nails whose length is 2 times greater than the thickness of the boards. When hammering nails, it is important to deepen the hats as deep as possible so that they do not interfere with the normal landing of the adjacent board. If the boards crack during clogging, the tips of the nails should be dulled by tapping them with a hammer. When driving a nail, it is better to place the nail under a slight slope towards the middle of the board.

The boards are laid the entire length of the flooring, positioning them so that the convex side of the annual rings looks up: this will minimize lateral warping and prevent cracking of the wood
When nailing strips, it is important to periodically monitor the size of the unshielded part of the platform. To make the last board full width, if necessary, adjust the gap width as you work. To adjust the dimensions of the flooring, the last board is cut along only as a last resort.
Stacked and fixed boards are trimmed. For this, along the sides of the platform draw chalk lines along which the protruding ends of the boards are sawed off. To get the most even cuts, use guide rails.
The finished platform is cycled, sanded and covered with several layers of semi-gloss or glossy varnish. If the deck is raised higher than 50 cm from ground level, it is fenced with a railing.

Using the angular support pillars, lateral rails are built around the perimeter of the deck, placing 7.5 x 5 mm beams horizontally at a height of 45 cm
From the bars with a section of 3.8 cm make blanks for intermediate thin balusters. They are nailed under the railing, placing at a distance of 5-7 cm from each other.
Making deck a part of nature
If a beautiful tree grows within the boundaries of the proposed platform, do not rush to get rid of it. You can always include natural elements in the deck design.

When planning to fit a tree into the platform, during the construction of the structure, you will have to make an internal frame around the obstacle
The opening in the flooring can be left open, or decorated with boards so that they bend around the plant. When surrounding a tree with flooring, keep in mind that as it grows, it will increase in size not only up, but also in breadth.

At the stage of determining the dimensions and drawing up a drawing of the future structure, it is important to provide for the tree a sufficient living space
Flooring cannot be attached to a tree trunk. This is bad both for the greenery itself and for construction. A trunk swaying under gusts of wind can disrupt the integrity of the platform.
There are no special difficulties in caring for the deck. It is only necessary to inspect the surface annually for cracks that may form during the drying of the wood. To preserve the presentability and extend the performance of the platform, paint layers should be regularly updated.