How do you feel about the mosquito buzz in the evenings and their desire to drink your blood? If normal, then you can safely start creating your own pond. But remember that warm water will lure a different vile, so in the evening the gatherings will have to be transferred to another place on the site where there are fewer mosquitoes. Consider how you can make a pond with your own hands at the cottage in different ways.
What kind of pond do you need?
The first thing the owners should decide for what purpose they create a reservoir. All existing options can be conditionally arranged in four groups:
- Small ponds that are created as part of a landscape composition and do not imply a rest near them.
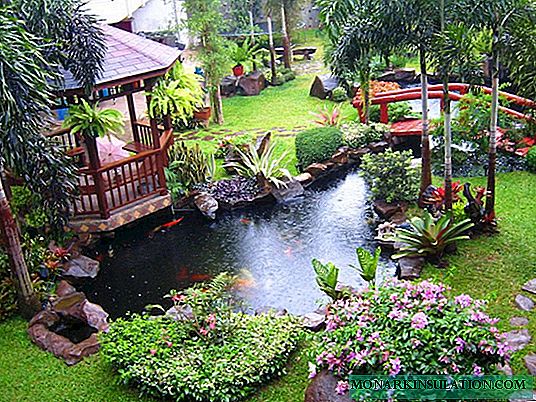
- Decorative ponds of small depth with streams, fountains or waterfalls that are part of the family recreation area.
- "Personal" lakes into which fish are released.
- Reservoirs for water procedures (home pools).
If you intend to use an artificial pond in the country at the same time for swimming and watching the lush vegetation and swimming fish, we hasten to warn: the construction of such an object will be expensive and, in the end, you will stop swimming in it.
For water procedures and for plant life, completely different water is required. For swimming, the pond must be covered with a roof so that less debris gets in, put water purification filters, constantly remove silt, mosquito larvae and foliage. Otherwise, the pool will become a hotbed of disease for your family. Plants need a different microclimate, and the construction of a pond will be cheaper.
You can find out how to clean a pond or a small reservoir yourself from the material: //diz-cafe.com/voda/kak-provesti-chistku-pruda.html
Example # 1 - a pond from an old bath
The fastest way to arrange a small decorative pond in the country is to make it out of some old container thrown by you or your neighbors. It is best to find a product with a capacity of more than one hundred liters, because smaller containers dry out quickly during the heat and you need to constantly add water. And if summer residents come only on weekends, then plants planted in a pond may not wait for them and die from “thirst”.
The best option is a pond in the country from the bath. Many residents today are replacing old steel or cast-iron models with more practical acrylic ones, or even replacing them with shower cabins. It remains only to find the one who makes the repair, and take out his "construction waste" to his cottage.

The pond from the bath will freeze in winter, so the plants must be stored for another winter
When the bath has "reached" the site, select the place where your body of water will be located. It is desirable that it is in partial shade and not in a lowland.
Preparatory work
- We dig a hole, the height of which is 30 cm more than the height of the bath. Pour the earth immediately into a wheelbarrow or bucket and take it away, because it will not be useful to you. If you are creating a pond already on the finished lawn - cover it with a film so that the decaying earth does not spoil the landscape.
- We lower the bath into the pit, having previously condensed and aligned the bottom. Check the level of the horizontal location of the edges.
- Pour sand into the voids between the bathtub and the ground and seal it with a stick.
- On the perimeter of the dug bath, remove the sod and dig a trench into the knee (to the top of the bathtub).
Design design
- Since the walls of the bath are too smooth and look unnatural, give them irregularities and change the color to beige. To do this, we buy glue with which ceramic tiles are glued, dilute it according to the instructions, add a beige dye and apply this viscous mass with a gloved hand to the inner walls. The layer should be thin and uneven. Cover the bath with a film and leave to dry for a day.
- On the edges of the bathtub and the dug trench, we lay a metal mesh around the perimeter and pour a thick concrete mortar along it, adding stones. Such a rim will not crumble and provide strength to the edges of the pond. With the same solution, we grease the drain holes in the bottom and wall of the bath. Leave to complete solidification.
"Settling the inhabitants"
- To keep the roots of the plants at the bottom, we pour dry clay into the bath with a layer of 6 cm.
- We prepare a viscous mixture from clay, diluting it with water, and coat the entire cement mortar located around the perimeter. You can immediately fix in clay the roots of perennials, which will decorate the edge of the reservoir, and fill up a layer of earth on top. On it lay decorative stones and plant vegetation.
- Inside the bath in the spring, put the bulb of a water lily so that in summer it will delight a flower. But for the winter it will have to be cleaned in a bucket of water and hidden in the basement.
Material will help you choose plants for the pond: //diz-cafe.com/voda/rasteniya-dlya-pruda-na-dache.html
Example # 2 - from a finished plastic mold or film
Choice of material for the bowl
The easiest way to make a pond in the country is with the help of a ready-made purchased PVC bowl. They are of various shapes and can be selected to fit your landscape. The main thing - during installation, clearly align with the edge level so that there is no noticeable artificial origin of the bowl.

The form can be ordinary - as in the photo, but you can get a more complex - multi-stage. It will look prettier, but mounting it is a little harder
More often, summer residents create the so-called "film" ponds in which water is held by a film lined throughout the pond. The choice of films is quite large, but the most durable is considered to be 1 cm thick butyl rubber. It is brought to order in different sizes, so you can find it under any bowl of a reservoir. Polyvinyl chloride films are considered cheaper. They are slightly thinner than butyl rubber, but they have different colors, so you can make the bottom blue, green and even brown. If you carefully lay such a film, avoiding damage during installation, then it will last at least 10 years. If you use a conventional film, then it must be laid in several layers and covered with a 15-cm layer of sand to protect it from ultraviolet radiation and frost.
We carry out preparatory calculations
If you have decided on the width and length of the future reservoir, then calculate its depth. To do this, the smaller number must be divided by 6. For example, the depth of the bowl 3 X 5 meters is 3: 6 = 0.5 m. The length / width is calculated by the following formula: length / width of the reservoir + double depth + reserve meter.
Such a calculation will help to avoid soil crumbling at too great a depth and not to make the bottom shallow.
Example: on a 3 X 5 pond (we calculated the depth above), you need:
- 5 + 0.5 X 2 + 1 = 7 meters in length.
- 3 + 0.5 X 2 + 1 = 5 meters wide.
Dig a bowl into the ground
Now we are working on the installation of the bowl:
- We dig out the bowl according to the marking, making the bottom 5 cm lower than the required depth. We remove all large stones from the bottom, level the ground and add a layer of sifted sand (5 cm) on top. It is best to make a foundation pit in steps.
- We align all the upper edges, checking the horizontal with a building level.
- We cover the bottom with a non-woven fabric (batting, synthetic winterizer or felt), and on top - with a film. The canvas will protect the film from contact with sharp grains of sand. We carefully line the film so that the substrate does not move out. The edges of the film should extend outside the bowl somewhere by 40-50 cm. We do not fix them yet.
- We fill the reservoir with water, having previously pressed it with stones. This is done so that the lined film fits snugly to the bottom and walls of the bowl, preferably without tension.
- The edges of the film on the surface are covered with earth and reinforced with decorative stones.
You can also equip a pond with a waterfall, read about it: //diz-cafe.com/dekor/vodopad-na-dache-svoimi-rukami.html

When creating a multi-stage pond, the film will need a little more than for a conventional

The substrate material can be put in pieces without fastening
It remains to sprinkle fertile soil and plant plants and shrubs in it. Fill the reservoir with plants that can coexist at the depths of your bowl and will not freeze in winter.
It must be remembered that the arrangement of the reservoir in the country is better to postpone for a couple of years if the kids live in the house. According to statistics, children under 3 years old are capable of drowning in a puddle, the depth of which does not exceed seven centimeters. If the pond has already appeared, then do your best to protect it.